Getting Started Guide: Link Tracking for Your Site

So you’ve been putting great content out on your site, sharing it every where you can and directing everyone in your network to it. But do you know if people are actually clicking these links and when? This information is crucial to figuring out what kind of traffic you’re driving, if your content is keeping people engaged and if the links to your site are inviting.

Luckily, there are some great tools to help you track you links and visitors to your page. Gone are the visit counters at the bottom of webpages, because pure numbers don’t really tell you anything. Now there are sites to help you easily track links and clicks without having to set up an entire analytics account. Read on for how to use these tools and get results.

Link Tracking Sites

Link tracking sites are very easy to use, and most just require a quick registration. They allow you to shorten, share and track links. Unlike site analytics programs, link tracking sites allow you track links from as many different websites as you would like all at once. These sites work by creating a shortened link for the URL you copy and paste into their program. Once the shortened link is created from you original URL you can then use that shortened link, which will look something like this: http://bit.ly/h7zi7A anywhere you’d like and see real time date for clicks. These shortened links function just like regular URLs.

Link tracking is helpful for seeing how often your link has been clicked, what the most popular click times were and clicks over a longer period of time like multiple months. You can take the link data these sites share and see what kind of content you’re sharing gets the most clicks and at what time to ensure you are posting content your visitors will like. Link tracking sites are also great for Twitter and other micro blogging sites with limited space as these services can make even the longer links much shorter.

Some examples of Link Tracking sites to check out:

Bitly- http://bit.ly/

TweetBurner- http://tweetburner.com/

Tiny URL- http://tinyurl.com/

Ow.ly- http://ow.ly/url/shorten-url

Remember to be able to rack these links you must sign up for an account. Happy Tracking!

Happy Earth Day, too!
New Tool: GDIWatch, A Free Downline Builder for All GDI Affiliates

We spoke many times on this blog of the power of Facebook. Now, Affiliate Growth Council member and Leader Board fixture, Tissa Godavitarne has gone one step farther by creating an app to help you with your GDI opportunity, no matter your sponsor or earnings.

I joined GDI as an affiliate back in August of 2008. Over the years, I’ve built a substantial residual income with GDI. Most of you have probably seen my name (Tissa Godavitarne) on the weekly GDI leaderboards. Without a doubt, the number one question I’m always asked by GDI affiliates is, “Tissa, how can I duplicate your success with GDI?”. That has always been a tough question to answer. What works for me, may not work for you, and vice versa. But with more than 500 million active users, Facebook can work for everyone! That’s why I created the Facebook app, GDIWatch.

GDIWatch leverages “social proof” and the viral power of Facebook to build your GDI downline. Here’s how it works: Every couple of days, GDIWatch will automatically post real-time earnings by GDI leaders on your Facebook wall (featuring your affiliate link). These wall posts let your Facebook friends – and their friends – see that real people are making real money with GDI. This is known as social proof, and it’s a proven marketing strategy. So even if you’re just starting out, GDIWatch allows you to leverage the success of GDI leaders to build your GDI downline.

GDIWatch is 100% free. It’s also free of any advertising, cross-promotion or cross-sponsoring. GDIWatch will work for you regardless of whose downline you’re in, or what GDI “system” you may be using. So stay with your current sponsor and system, but add GDIWatch (and Facebook!) to your marketing arsenal. Help your downline by telling them about GDIWatch as well (use the ‘Contact Downline’ feature in your GDI back office). Since GDIWatch is free and simple to use, it can be easily duplicated by your downline. Remember, when your downline earns, you earn!

Start leveraging social proof and the viral power of Facebook to build your GDI downline. Start using GDIWatch today.

http://facebook.com/gdiwatch

~ Tissa Godavitarne

*GDIWatch is not sponsored nor created or maintained by Global Domains International, Inc.

Getting Started Guide: WordPress Plugins

We’ve gone over Themes and Widgets for customizing your WordPress site, and now we move on to the most impressive facet of WordPress: Plugins. Plugins are simply WordPress add-ons and customizations that are developed by mostly by outside developers and but also by WordPress. The plugins can range from simple to very specific. You may be asking yourself why plugins aren’t automatically included, well, WordPress has left them as an extra so you have the option of making your blog or site as basic or complex as you like.

Plugins on WordPress can do almost anything you would like your site to do. You can search for a plugin to make your blogs shareable, create a custom contact form, or link your social media accounts. But this is just the beginning. Want a plug in that will email a new blog visitor? Search for it. It’s there.

To put it simple, WordPress describes their plugins as: “Plugins can extend WordPress to do almost anything you can imagine. In the directory you can find, download, rate, and comment on all the best plugins the WordPress community has to offer.”

Why do I need plugins?

Maybe you don’t: In all honesty, you may not need or use any plugins that are offered. The standard WordPress offering is quite complete and plugins are a bonus for anyone interested.

Maybe you do: But, if you want to venture into the world of plugins, simply search for what you may want to add to your blog. Looking for a way to share your blog on social bookmarking sites? Navigate to the plugin link on your dashboard and then search “share,” or for specific service, “ShareThis,” which is what this blog uses at then end of each post. Another great plugin is Akismet, which can be free or you can chose to donate a certain amount. Akismet operates only on the backend of your site and monitors your blog comments and keeps spam posts from being posted and driving you nuts. If these two offerings sound great to you, it’s time to learn how to get started with plugins.

How do I use them?

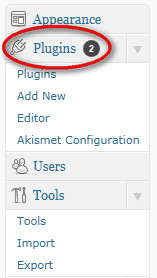
Search for Your Plugin: The easiest way to search for, download and activate plugins is right through your WordPress dashboard. Navigate to Plugins>Add New and then search for what you may need. Perhaps it is a program that will share your recent Tweets in the sidebar of your blog, like this blog has. You would Search: “Twitter” and browse through the results. Read the descriptions of the plugins to ensure you are one the right path. Also be sure to read reviews on each plugin, because most are developed by outside sources and may not be the best option. Once you see a plugin you would like, click “Install Now.”

Activate Your Plugin: If the plugin is something that will appear on the front end of your site, like the recent tweets plugin you can see on this blog, then it will show up in your widgets area once it is downloaded. Then you will treat is like a widget with the drag, drop and customizing you learned about in this past post. If the widget is something that will only work on the backend of your site, like Akismet, you will just need to activate the plugin in the plugin area as it will not appear on your front end.

Be sure to check the front end for changes and check the back end of Twitter to see if programs like Akismet are working.

Good Luck and leave any questions you have about WordPress Plugins in the comments!

Your Home for GDI News, Advice, and Contests