Tag Archives: beginners

One Month with GDI

cal1Congratulations on completing your first month with GDI! Now that you’re familiar with the business and your domain, it’s time to take the next step. Here’s what to think about after thirty days.

Complete Your Learning Bonus

You have eight weeks to complete your Learning Bonus. If you haven’t begun the steps to earn the Learning Bonus, start now! Don’t lose out on the Learning Bonus by running out of time. The steps are achievable and a step by step list can be found in your Members Area when eligible.

Connect with Your Downline

Tell your downline and your network that you are available and encourage them to reach out to you if needed. You want to establish a level of comfort that ensures everyone in your network  can achieve their full potential. Try to offer help and guidance even before it is needed. All affiliates experience the same process and tend to share many of the same highs and lows. Everyone, even our most successful affiliates, had to start somewhere. Take the time to share some of the important lessons and experiences that helped to make your GDI business a success.

Consider the Duplication Bonus

All GDI affiliates can benefit from the GDI Duplication Bonus. The goal of this bonus is to help the new customers you personally refer to learn, use, and benefit from GDI’s products and services. Every directly referred new customer under you that gets paid their GDI Learning Bonus will count towards 1 check mark for your GDI Duplication Bonus. 10 check marks will earn you $250! The best part is that this bonus is UNLIMITED, you can earn $250 for every 10 directly referred signups who earn their GDI Learning Bonus.

Why Aren’t I Making Money Yet?

One question we get from new affiliates is, “Why aren’t I making any money.” This often comes within the first few weeks of joining as an affiliate and is nothing to worry about. Becoming a GDI affiliate is your first step in building your own business. As such it may take a little time as you learn what you’re doing before you make money. GDI knows if can be discouraging if you aren’t earning Income for Life as quickly as you’d like. Here are two ways you can work to earn income right away as a new affiliate.

Signups

This is the main way affiliates can earn income. When you sign up for GDI, you are essentially signing up for two things. You have agreed to sign up with a sponsor, or if you registered without a sponsor, one will be assigned to you. When you sign up with a sponsor, you become part of their team or downline. When you sign up people below you, they become a part of your team or downline. For each person you sign to your downline you are paid out $1 per month per person in your downline. So it’s up to you to get downline signups and ensure they convert to active affiliates. Signups that just stay on for the trial and leave do not count towards your downline or commissions.

Learning Bonus

The Learning Bonus is a reward for taking the first steps to being successful with GDI. It’s a $25 bonus that affiliates can earn within their first two months with GDI. This is a great way to learn more about GDI and earn income easily within your first weeks with GDI. The steps are achievable and a step by step list can be found in your Members Area when eligible.


Get Started with WordPress

1. As a GDI affiliate, you don’t have to go through the process of registering with WordPress. It’s an option we offer through your account, so you just need to follow the next steps to get started. To access your already created account with WordPress, navigate to your Members Area then to Plugins>WordPress and toggle the on/off button to “On.” The link that appears below with the format blog.yoursite.ws is where you blog will exist.

a. You can have up to five (5) blogs as a GDI Basic Affiliate. To set your blog as your primary webpage simply click the options button to the right of the URL you would like in the plugin area and select “set to primary.”

2. Click on that link to see what your blog currently looks like. Maybe you like this format just fine and want to start posting, or maybe you want to change it completely. Either way you need Editto access the backend to do these things. WordPress calls the main area of the backend the “dashboard.”

3. To access the backend or dashboard, simply return to your plugin area. Near the URL of your blog or site, you will see an edit button. Clicking the edit button will bring you to the Log In area for WordPress. Your user name and password are same as your Members Area user name and password.

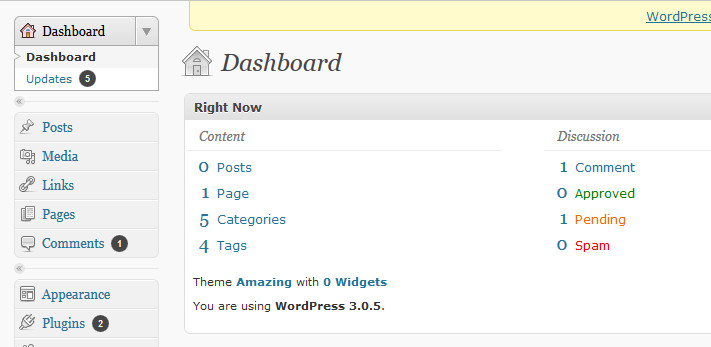
4. Once you have successfully entered your user name and password you will be taken to the dashboard. Which should look like the image below. Your dashboard is you main backend area in WordPress where you will be able to find everything you need.Dashbpard2

5. If you are happy with the way your blog currently looks, then you can begin publishing blog posts. To create a new blog post, navigate to Posts on the left hand side of the dashboard. When you click on Posts or any of the titles on the left hand side, a submenu will appear. In the Posts submenu you will see Add New, Categories and Post Tags. When you click on Posts, WordPress will take you by default to a list of your past posts, this will appear on the right hand side. WordPress automatically populates a post, which you will see in the list. You can delete that post by selecting Trash from the options that will appear if you hover your mouse over the post title.